Friday, 5 February 2016

dig

Dig
The ‘dig’ is a command line tool used in network administration that check and lookup domain name server (DNS) It is dnssec and the part of information gathering.
Well further can’t be discussed much until I give you the definition of name servers….until then everything I say will be moot.

What is domain name server?

A name servers is a software and hardware server that provides provides a network service present at the application layer of the OSI model response  the queries against a directory service. The server component of the domain name system is the perfect example of that. Its job is to translate the ip address from the domain names provided.
So, bottom line dig is the shorthand of domain information groper, it uses DNS (Domain servers) lookups and gropes the information from the name servers.Why didn’t they use grabber is beyond me!!
So now the usage of this command in

Usage of the dig command.

First on the terminal use the command
dig -h
This command would show all the options used in dig


In the similar way many of the given commands can be used. For eg, lets use authority now.
dig authority www.google.com
dig 2

in the above command, the result indicates that the authoritative search went from ns2->ns1->ns4->ns3, that means name server 2 have more authority over the search according to the context of the domain name over name server 1.
Now lets fool around with some other commands
dig nssearch www.facebook.com  **searches for name servers**
                                
 dig additional www.facebook.com **controls all additional queries **
dig 4
dig nsid www.facebook.com ** searches for the name servers ID**
                            

Installation instructions for Kali Linux on a MacBook

Installation instructions for Kali Linux on a MacBook


Below is a brief overview of the Mac Installation video Apollo Clark posted on YouTube. I found the overview to be too fast-paced since I am more familiar with Windows and Macs than with Unix / Linux, so I have outlines a few of the steps. 

Step 1: 
  • Download, Install, and Configure Oracle's VirtualBox and Extension Pack from http://virtualbox.org/wiki/Downloads according to the video. 

Step 2: 

  • Make sure in the BIOS that you have enabled AMD

Step 3: 
  • Download the Kali Linux 64 bit Torrent from http://www.kali.org/downloads/ . This is going to take a while. 


Step 4: 


  • The tutorial doesn't mention that you need to then open up the Torrent file in a program such as UTorrent at http://www.utorrent.com/ ... when you download uTorrent, watch to make sure you aren't accidentally agreeing to change your Yahoo Search bar or install any extra toolbars you really don't want. 


Step 5:  


  • Once you have uTorrent or another Torrent program, you will see the directory "kali-linux-1.1.0-amd64" that contains the file "kali-linux-1.1.0-amd64.iso" that will be booted up when the virtual machine starts up. By the way, PAE/NX stands for Physical Address Extension (PAE) and NX processor bit (NX).


Step 6: 


  • Install Kali Linux on your new Debian virtual machine configuring the network, setting the root password and time zone, and partitioning the hard drive for the virtual machine. The GRUB Bootloader is the program that is based on the old GRand Unified Bootloader. 


Step 7: 


  • Reboot the machine, choosing to boot up Kali GNU / Linux, with Linux 3.18.0-kali1-amd64 . After logging in as root, you install VirtualBox Guest additions for Kali Linux. 

hping

hping

 hping is a command-line oriented TCP/IP packet assembler/analyzer. The interface is inspired to the ping(8) unix command, but hping isn't only able to send ICMP echo requests. It supports TCP, UDP, ICMP and RAW-IP protocols, has a traceroute mode, the ability to send files between a covered channel, and many other features.

1. How to open hping3
A. GUI Method
Application →Kali Linux → Information gathering → Live Host Identification → hping3
(click on image for large view) 


B. open Terminal type hping3 –h this command open hping with help options


2. Here we are scanning a host.


SET

SET

The Social-Engineer Toolkit is an open-source penetration testing framework designed for Social-Engineering. SET has a number of custom attack vectors that allow you to make a believable attack in a fraction of the time.

In this i'll show you how to Simply use Social Engineering toolkit on Kali Linux

Steps:
1--> First of all open terminal and then type se-toolkit and hit enter. If you are not logged in as root then type sudo se-toolkit and hit enter it will ask you administrative password enter the password then it will ask you to accept licence agreement press 'y' (without quotes) and hit enter you'll be given a list

2--> from the menu enter 1 it will take you to another menu

3--> from above menu select "Website Attack Vectors" i,e press 2 and hit enter


4--> from above menu select "Credential Harvester Attack Method" i,e press 3 and hit enter

5--> from menu below select "Site Cloner" i,e press 2 and hit enter

6--> if it asks you your IP address then open another terminal and type ifconfig (if not logged as root then type sudo ifconfig) and copy your IP address and paste it in the previous terminal where it asked for IP address

7--> now enter the url to clone e,g http://www.facebook.com
wait a little bit...

{Note: Don't Close the se-toolkit running terminal cuz you'll recieve information there.}
8--> now shorten that copied IP Address using any url shortener service and then send the link to your victim if s/he enters his/her credentials you'll get them in your se-toolkit running terminal. And when you are done hit ctrl + c

Thursday, 4 February 2016

URLCrazy Tool

URLCrazy

URLCrazy is a tool that can generate and test domain typos and variations to detect and perform typo squatting, URL hijacking, phishing, and corporate espionage. It generates 15 types of domain variants, knows over 8000 common misspellings, supports multiple keyboard layouts, can check if a typo is a valid domain, tests if domain typos are in use, and estimates the popularity of a typo.

1. How to open
A. GUI Method
Application → kali Linux → information gathering → DNS analysis → UrlCrazy
                                                                  (click image for large view)

B. Open Terminal type urlcrazy and hit enter.

2. This command is used to scan a url after scanning we can see names of the characters on the wrong web, Spelling reversed etc kindly use this command and see yourself I cant show you whole image here.
Syntax – urlcrazy domain
Ex – urlcrazy www.google.com

3.  This command is used to check domain popularity.
Syntax – urlcrazy –p domainname
EX – urlcrazy –p www.mcdonalds.com

4. This command is used to show invalid domain name
Syntax – urlcrazy –I domainname
EX – urlcrazy –I www.mcdonalds.com

5. This command is used to do not resolve the DNS
Syntax – urlcrazy –r domainname
Ex- urlcrazy –r www.mcdonalds.com

Metagoofil

Metagoofil 

This Tools already exists in the Kali Linux, these tools can seek information from several formats .doc exampledokument, .PDF, .jpg, etc., and not only found the documentary even to download documents these documents therefore we should have a large internet bandwidth.


Metagoofil can be found on the menu such as picture below:


The use of Metagoofil:

Open terminal and type: metagoofil


Description:

-d filled the target url (domain)
-t is in charge with the document type on the search,
-l limit the limit of the download file
-o directory where we store the result download documents,
-f is the result of an action that is saved in html form

I'll give an example like the following


root@Ddos:~# metagoofil -d securitytube.net -t doc,pdf -l 20 -n 10 -o ddos -f securitytube.html


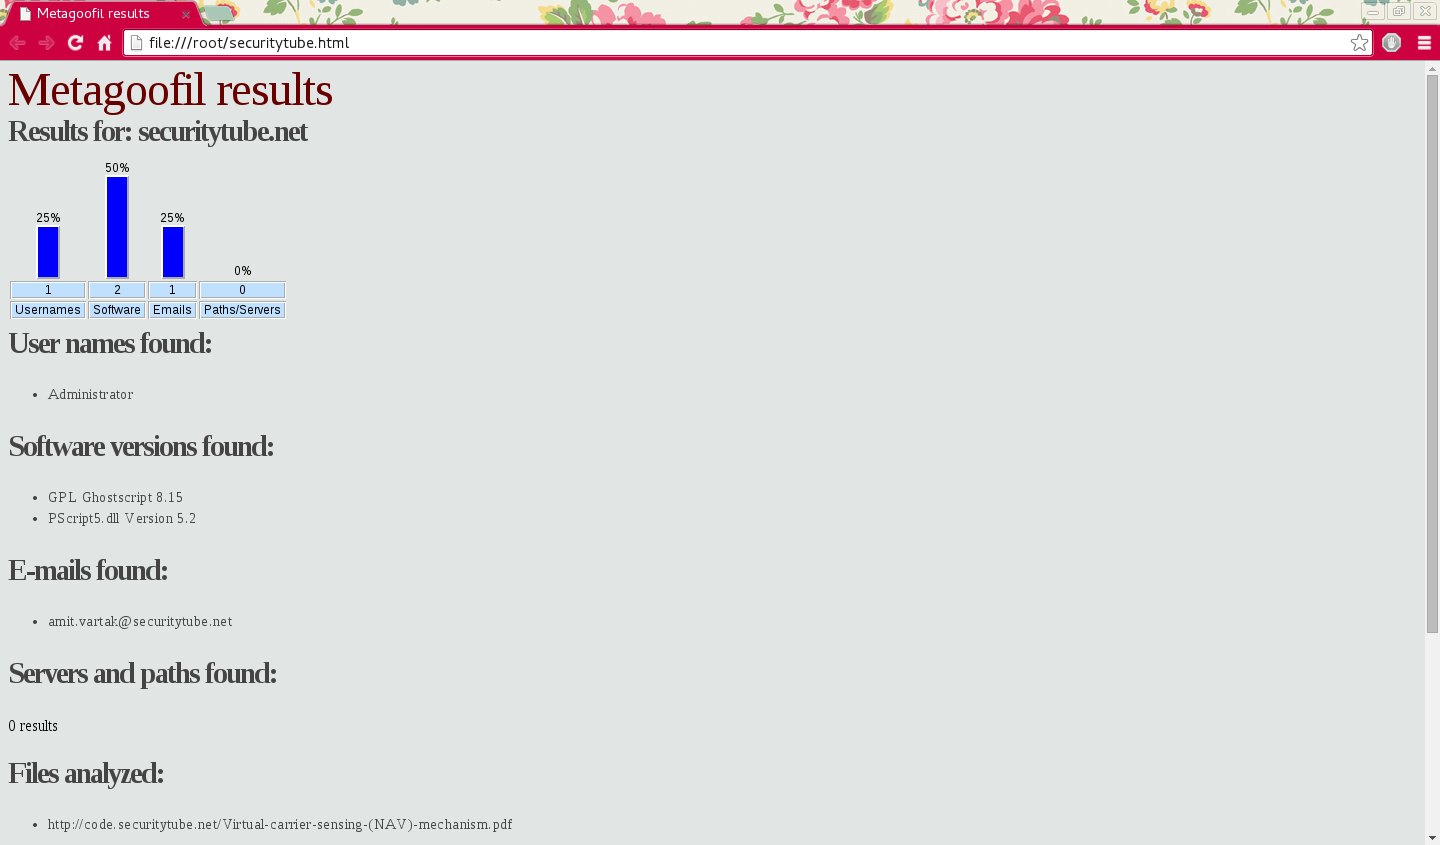
Ok, we can look at writing that I give red box, it looks there is writing http://code.securitytube.net/Virtual-carrier-sensing-(NAV)-mechanism.pdf. It is  .pdf document, we have downloads, to check if all the documents have been properly downloaded can be in check in the directory that I created called ddos please check in the folder


Open the securitytube.html to view Metagoofil results


Wireshark Tool

Wireshark
Wireshark is a very powerful and popular network analyzer for Windows, Mac and Linux. It’s a tool that is used to inspect data passing through a network interface which could be your ethernet, LAN and WiFi.
The series of data that Wireshark inspects are called ‘Frames’ which includes ‘Packets’. Wireshark has the ability to capture all of those packets that are sent and received over your network and it can decode them for analysis. When you do anything over the Internet, such as browse websites, use VoIP, IRC etc., the data is always converted into packets when it passes through your network interface or your LAN card. Wireshark will hunt for those packets in your TCP/ IP layer during the transmission and it will keep, and present this data, on its’ very own GUI.
It is important to note that whilst this is an excellent tool for a network administrator that needs to check that their customers sensitive data is being transmitted securely – it can also be used be used by hackers on unsecured networks – such as airport WiFi. Moral of the story at this point is tostay clear of clear text http protocols: that is the best advice we can give. To remedy this we would encourage you to use a Firefox addon called https everywhere or use an SSH or VPN tunnel.
Step 1: Start Wireshark!
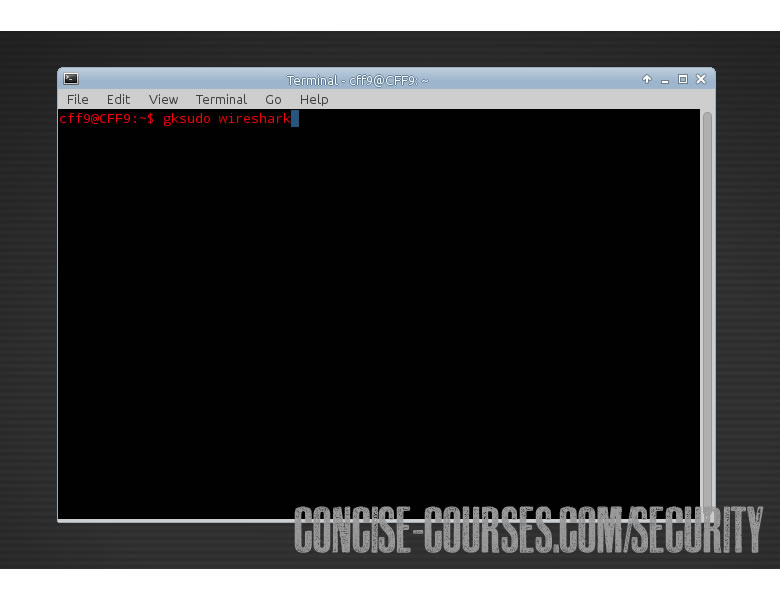
To open wireshark in Linux (after you have downloaded it) open it in a terminal with: “gksudo wireshark” – this will open the wireshark GUI. Worth quickly noting that wireshark comes pre-installed with most pentesting Linux distro’s like BackBox and Kali Linux. The “gksudo” command tells your Linux box to open the application, in this instance wireshark, in its’ native GUI whilst in a super-user mode, aka. Sudo.

Step 2: Wireshark GUI
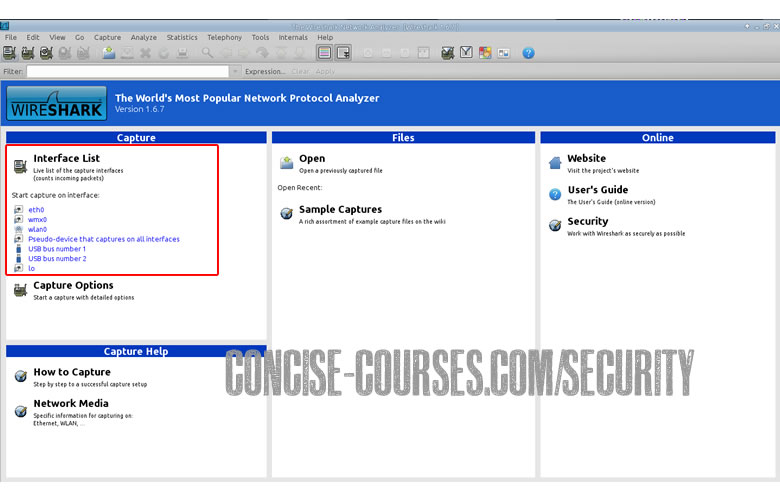
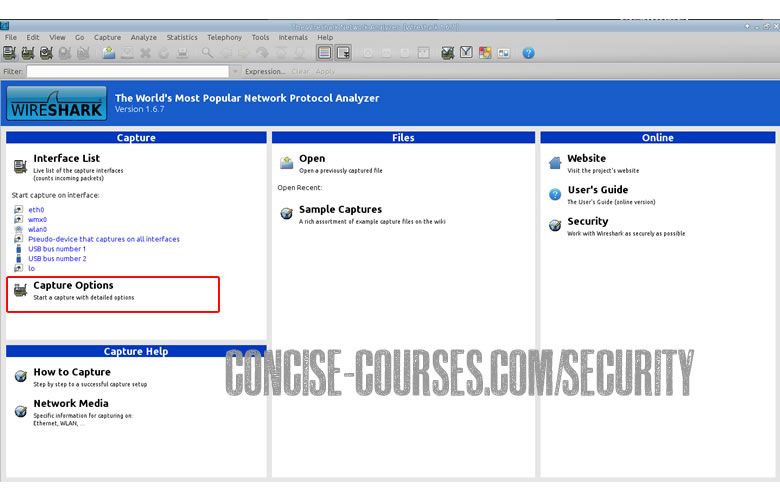
Once the wireshark GUI has opened, you’ll see that the dashboard has a left column box called ‘Interface List’. This list lets you know which devices and capture cards you can use. At the top of the application there is an option called ‘Capture Options’ which is exactly that, it allows you to modify and tweak how you would like to capture the packets of data that are being transmitted over your network.

Step 3. Wireshark Interface
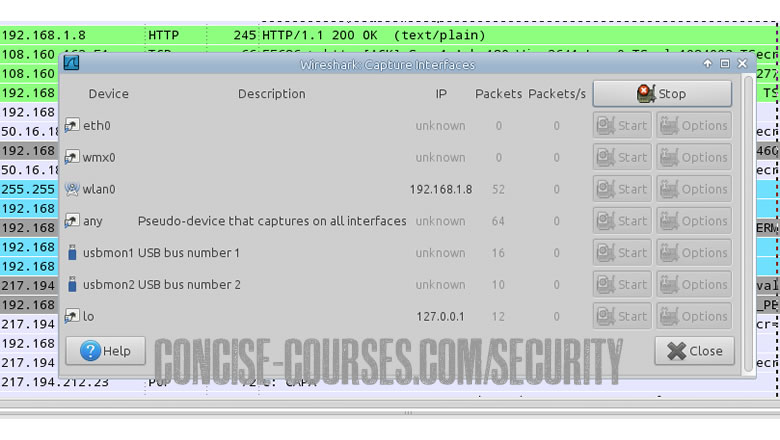
If you have a look at your interface list (see Step 2 and the associated screen shot) you’ll see that one of your devices is actually sending and receiving packets. Options include promiscuous mode andcapture mode etc. Have a play around with these and understand what each of these functions does – and you will rapidly learn how to effectively use wireshark.

Step 4. Capture Interface Options
This screen shot shows the wireshark capture interfaces, in other words, it shows what processes and platforms are receiving and sending data on your machine. If you have a wireless card, then it will show it, etc.

Step 5. The Main Packets Panel
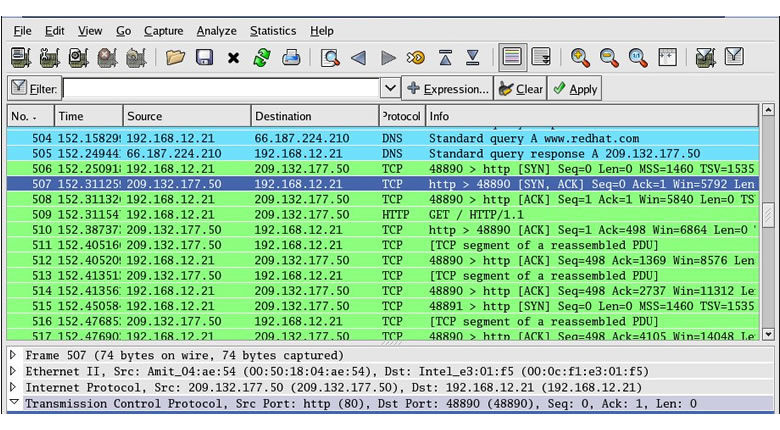
Once you are happy with the interface you’d like to use, go ahead and click ‘start’ and wireshark will show all the packets that are being transmitted over your network. If you open a web browser or for exampl,e watch a video on YouTube, you’ll notice a sudden surge of packet data. The whole point here is to find patterns or anything that looks suspicious. Taking the columns at the top of the wireshark interface from left to right, the first number is the ‘packet number’. The second column shows how many seconds it has been since the start of the capture. The third column is the source IP Address and the fourth column shows the destination IP Address. The fifth column is the protocol that sent the packet, i.e. it could be DNS, TCP (Transmission Control Protocol) or even HTTP.

Filtering the packets is key when using wireshark – done by using the search bar within the interface (top left). If you right click on a packet of interest you can ‘follow TCP stream’ and you get a ton of raw information.